Anyone can easily get the hang of...
21
04
Anyone can easily get the hang of it! Let's install a Wi-Fi router
I installed TP-Link Japan's Wi-Fi router "Archer C9"
Part 1 of the wireless LAN introduction technique explained the basics of lines and Wi-Fi routers. In Part 2, we will explain in detail how to install and set up using the Wi-Fi router that is actually sold. The explanation uses the TP-Link Japan Wi-Fi router "Archer C9" (related article).
Wi-Fi router installation is often completed by simply removing it from the package and wiring it. However, for FLET'S Hikari and some FLET'S ADSL, if you need to install the dedicated software on the PC in the manual for line connection, or if you have to make connection settings such as "PPPoE" connection after wiring. There is also.
Here, the explanation is based on the assumption that the fixed Internet line provided by NTT's FLET'S Hikari and cable TV companies is already open, and the modem provided by the line carrier is connected.
Let's install it in a place with good visibility!
The best place to install the Wi-Fi router is in a place where you can see from the place where you use the device. Communication when there is something that causes radio wave interference or attenuates radio waves, such as devices that use radio waves such as microwave ovens and metal objects, on the line connecting the Wi-Fi router to the place where you use a PC or smartphone at a straight distance It slows down.
Install your Wi-Fi router in a straight line as much as possible without these devices. If possible, installing it in a high place in the room, such as a tall shelf, tends to improve the radio sensitivity in the room.
The Wi-Fi router connects to the part that connects the modem and the PC instead of the PC. Therefore, when connecting the modem and the Wi-Fi router with a LAN cable, the modem side is written as "PC" on the cable connection port, and the Wi-Fi router side is written as "Internet" or "WAN". Connect the port with a cable.
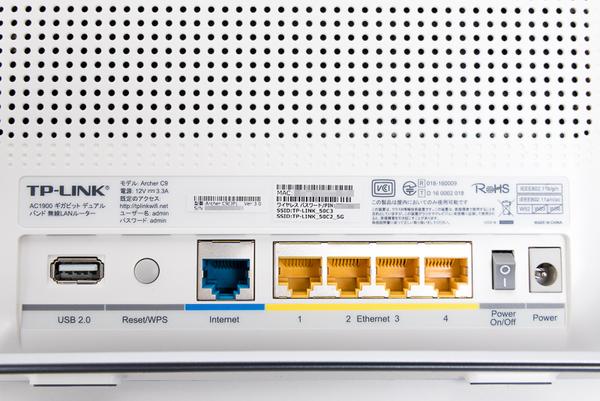
The back of the Archer C9.Connect your modem to the blue LAN port labeled "Internet" in the center
On the modem side, connect the LAN cable to the part marked "LAN", that is, the port that connects the PC by wire.The modem in the photo is a VDSL modem for au Hikari.
If you don't need to set up, just turn on the Wi-Fi router and the installation will be completed. In most cases, just turn on the Wi-Fi router and it will connect automatically, but just in case, check the status lamp to see if the Internet is connected.
The Wi-Fi router always has a status lamp that allows you to check the connection status, so check the instruction manual to see which lamp is connected to the Internet. In the case of "Archer C9", you can connect to the Internet when the fourth lamp from the right lights up.
Many recent Wi-Fi routers have Wi-Fi settings written on the back of the main unit, so if you set the connection settings for Wi-Fi on your smartphone or PC while looking at this, you can go through Wi-Fi. You will be able to connect to the Internet. Again, in the case of a "PPPoE" connection, you can't connect to the Internet just by connecting the cable and turning on the power. You need to enter the user ID and password from the Wi-Fi router setting screen explained later.
Many Wi-Fi router products have Wi-Fi connection settings on the back. Products that can use both 2.4GHz and 5GHz have their respective SSIDs listed.

For products that can use the 5GHz band and 2.4GHz band at the same time, two Wi-Fi settings are written. In the case of Archer C9, "TP-LINK50_C2_5G" is the 5GHz band and "TP-LINK50_C3" is the 2.4GHz band as the ID for identifying Wi-Fi called "SSID".
This is not limited to Archer C9, but other manufacturers also set it to the 5GHz band if the letters "5G" and "a" are included, and to the 2.4GHz band if there is no letter "g" or anything in particular. If you have a smartphone or PC that can use the 5GHz band, you will see two SSIDs in the 5GHz band with the letters "5G" and an ID in the other 2.4GHz band. On the contrary, if it cannot be used, the SSID of the 5GHz band containing the characters "5G" will not be displayed. Therefore, if the SSID with the letter "a" is displayed and the distance is close to the Wi-Fi router, it is recommended that you can use the 5GHz band by connecting to this ID.
On PCs and smartphones that can use 5GHz, two SSIDs of Wi-Fi routers appear in the Wi-Fi connection setting part.
When you select the SSID you want to connect to, you will be asked to enter the password, but since the setting is also written on the back of the Wi-Fi router, enter it as it is. Please note that it is easy to make a mistake when entering similar characters such as "0" and "o".
The password to connect to Wi-Fi is also printed on the back of the Wi-Fi router.Be careful of typos and type
If you need to set up a "PPPoE" connection, you often download a dedicated app or software from the Wi-Fi router manufacturer and install it on your smartphone or PC. If you do not use the app, enter the Wi-Fi router address from a web browser to access and set the Wi-Fi router.
TP-Link app "Tether" that allows you to set "Archer C9" etc. from your smartphone. You can download it by scanning the QR code on the side of the package. It is available for iOS and Android, and you can set the router and refer to the list of connected devices.
You can also set up a "PPPoE" connection from your smartphone without using a PC.You can also set media sharing and manage parental controls.
When Wi-Fi is connected, enter "tplinkwifi.net" in the browser, and "Archer C9" will access the web server built into the Wi-Fi router.
In both cases, there is actually a web server inside the Wi-Fi router that can record unique settings and information, so I access and configure the settings. On the connection settings screen, in addition to the "PPPoE" connection settings, you can strengthen security settings and change the Wi-Fi password.
Enter the ID and password to enter the setting screen first
For "PPPoE" connection, enter the ID and password in the document sent from the line provider that provides the modem such as NTT.In some cases, the instruction manual says to install the software on the PC, but if you enter the ID and password in this part, you do not need to set it on the PC side.
For a "PPPoE" connection, enter the ID and password in the document sent by the line provider that provides the modem.In some cases, the instruction manual says to install the software on the PC, but if you enter the ID and password in this part, you do not need to set it on the PC side.
After that, change the "MAC address clone" and Wi-Fi settings. If you are instructed to check and describe the MAC address of your PC when you subscribe to the line, set the MAC address described here.Other than that, it is not necessary
If possible, it is desirable that the Wi-Fi settings are unique rather than the default values. However, if it is used by a family member other than yourself, it is often difficult to understand the settings if you change it, which may cause operational confusion.However, if you do not change it, security will be weak, so if you want to share it with your family, you need to take security measures such as limiting the devices that can connect to Wi-Fi and hiding the SSID.
The setting is completed.Now you can access the internet via Wi-Fi
If possible, you should take security measures to prevent your Wi-Fi from being abused or infected by a virus.You can make settings to strengthen security from "Detailed settings" on the setting screen.
Summary ・ In many cases, Wi-Fi can be used just by installing and wiring. ・ In addition to installation, settings are also required with apps and software for PPPoE-connected Internet lines. ・ For smartphones and PCs that can use the 5 GHz band, two SSIDs are available. Is displayed


