How to scan documents and images wi...
01
10
How to scan documents and images with your smartphone? How to use each application and how to import cleanly
Opportunities for remote work and home learning have increased, but the network environment and apps have improved, and most things can now be done at home. On the other hand, even though many documents have been digitized, paper documents are still used, and you may want to scan your handwriting and attach it to an email. Alternatively, if you scan materials for assignments or school notices, you can check them on your smartphone anytime, anywhere.
If you don't have a scanner at home, you can use a multifunction device at a convenience store. Some apps that support scanning, unlike just taking pictures with a camera, can correct distortion during shooting to make it easier to read, or convert text into data.
In this article, we will introduce apps that can scan for iPhone and Android and how to use them.
First, I will show you how to scan with the standard iPhone app.
If you use the iPhone standard "Memo" application, you can import the captured document as a PDF. Multiple documents can be photographed continuously, in which case they become a multi-page PDF. Also, like a memo app, you can leave a memo about the document you took.
The photos you take can be viewed in the "Memo" app, and can also be viewed from other devices such as Macs if you are logged in to iCloud with the same Apple ID. You can also share it by attaching it to an email.
1. Open the "Memo" app and select an existing memo or create a new memo from the icon on the bottom right.
2. Tap the camera icon and tap [Scan Documents].
3. If the upper right is set to [Auto], it will automatically take a picture when the document is recognized. If the document is not properly recognized because it is folded, etc., tap the shutter button to take a picture (scan). Since the captured image is displayed, drag the circle marks at the four corners to the corners of the document to adjust the scanning range. Finally, tap [Keep Scan].
4. You can continue to scan another document, in which case you can save it as a multi-page PDF. Tap [Save] when all scanning is completed.
The scanned document is saved as a memo and can only be checked from the memo app, but you can share the scanned PDF file or open it with other apps by following the steps below.
1. Open the memo and tap the scanned document in the memo.
2. Tap the [Share icon] on the upper right and select the app you want to share, such as email or cloud storage.
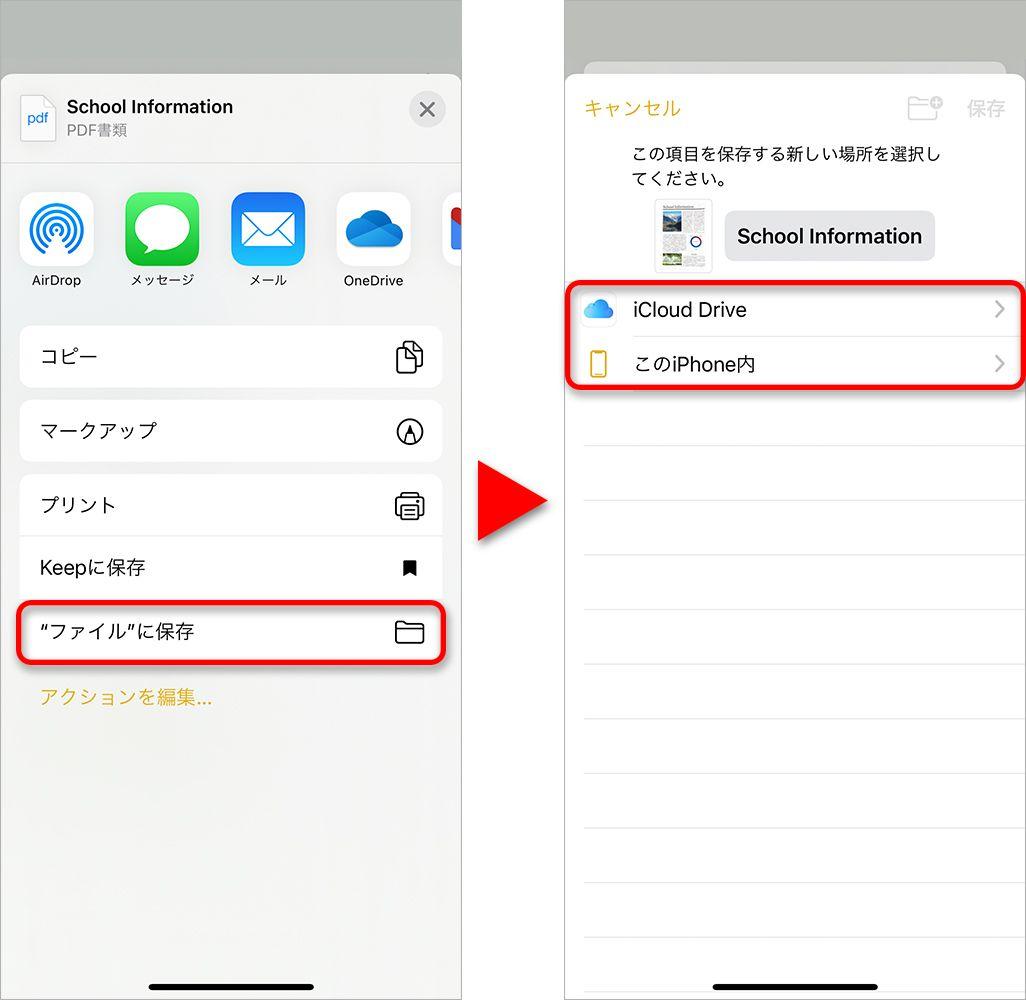
3. At this time, if you select [Save to "Files"], you can save the PDF file to your iPhone or iCloud. The saved PDF can also be viewed from the "Files" app or other apps.
You can also scan documents and save them as PDFs from your iPhone's Files app. The scanning function itself is the same as the "Memo" app, but instead of attaching it to the memo, the "File" app allows you to save it as a PDF directly in iCloud or iPhone.
If you want to use it later from other apps, it's easier to import it with the "Files" app. It would be a good idea to use it properly by centrally managing it in the "Memo" app or using it in other apps.
1. Open the "Files" app and tap "Scan Documents" from the top right menu.
2. Similar to the "Memo" app, if the upper right is set to [Auto], it will automatically take a picture when it recognizes the document. If the document is not properly recognized because it is folded, etc., tap the shutter button to take a picture (scan). Since the captured image is displayed, drag the circle marks at the four corners to the corners of the document to adjust the scanning range. Finally, tap [Keep Scan].
3. You can also scan another document in succession, in which case you can save it as a multi-page PDF. Tap [Save] when all scanning is completed.
4. The save destination selection screen will appear, so tap [iCloud Drive] or [On this iPhone] and select the folder to save. After saving, it will also be displayed in [Recent Items] in the "Files" app.
Since the scanned document is saved in the specified location, you can refer to it directly from the application that opens the PDF. You can also share it by attaching it to an email.
In the "Files" app, open the scanned document, tap the [Share icon] in the lower left, and select the app you want to share, such as email or cloud storage.
Next, I will introduce how to scan with the Android standard application.
On Android, you can scan documents from the Google Drive app and save them as PDFs. If you scan multiple sheets in succession, it is also possible to make a multi-page PDF. Scans are saved directly to Google Drive, so they can be quickly referenced from other devices, PCs and Macs.
1. Open the "Google Drive" app and tap the [+] icon at the bottom right. Tap [Scan] from the New menu.
2. The camera will start up, so take a picture of the document.
3. When you take a picture, the range of the automatically recognized document is displayed in a clipped state. If the range is not recognized correctly, you can re-specify the document range by tapping the [Clip icon] at the bottom right. Drag the circles in the four corners and tap [Done] according to the range of the document.
4. In Google Drive, in order to increase the contrast of the text and make it easier to read, black and white documents are filtered with [Monochrome], and colored documents are filtered with [Color]. If you want to use the image as it was taken with the camera, select [None] from the filter icon.
5. Finally, tap [Save] to specify the file name and save destination.
Since scanned documents are saved in Google Drive, if you use the same Google account, you can easily refer to them from a device that can access Google Drive, such as a smartphone or PC.
If you want to share with other people, you can use the sharing function of Google Drive or attach it to an email.
1. To use the sharing function of Google Drive, open the scanned document with the "Google Drive" app and tap the [Menu icon] in the upper right. Next, tap [Share].
2. Since the screen to specify the sharing partner will be displayed, specify the e-mail address of the person who can access the file. You can also enter a name if it is registered as a contact on your smartphone. At this time, instead of specifying the other party, if you want anyone who knows the link to be able to access it, tap the [lock icon] at the bottom left.
3. Tap [Restricted] in the link settings, then select [Anyone with the link].
4. Now let's share the link that is displayed to the users who can access it by e-mail. Anyone who knows the link can access it, so be careful not to let an unspecified number of people, such as SNS, know.
Instead of using the sharing function of Google Drive, you can also attach the file itself to an email and send it.
1. Open the scanned file in Google Drive and tap the [Menu icon] in the upper right. Then tap Send a copy.
2. Since the sharing menu is displayed, select the application you want to use such as Gmail.
In addition to the standard OS applications such as iPhone and Android, there are applications that support document scanning. For the purpose of scanning and saving documents, the standard OS functions are sufficient, but some apps have additional functions such as whiteboard and business card reading modes, and the ability to convert read text into text. .
Here are some representative applications. All of them can be used for free, but there are some that allow you to use additional functions by making in-app purchases (subscription contracts).
Adobe's document scanning application supports not only documents but also business cards and whiteboards. In addition, it has an OCR function that analyzes the read text and converts it into text, and the captured document is converted to PDF with the character string searchable.
1. When you launch the app, it should be in a shooting state like the image on the left, but if a list of files like the one on the right is displayed, tap the camera icon on the bottom right.
2. Tap the [Shutter Button] to take a picture, and a preview will be displayed in the lower right corner, so tap [Preview].
3. If the recognition range of the document is not correct, you can also tap the [Clip icon] and specify the range of the document again. When you have finished making corrections, tap the check icon in the upper right.
4. Correct the file name if necessary and tap [Save PDF]. The files are stored on Adobe Cloud.
5. After saving, the list screen will be displayed. "Adobe Scan" itself does not have a PDF opening function, so it is necessary to install the free application "Adobe Acrobat Reader" separately.
Alternatively, on Android, you can save the PDF to your device by selecting Copy to Device from the More menu. If you save it to your device, you can open it from other apps that support PDF.
For iPhone, select [Share a copy] from the [Share] menu.
If you select [Save to "Files"] from the Share menu, you can save to iCloud or iPhone.
"Microsoft Lens" can save captured images directly to PDF, Word, PowerPoint, and OneNote. When saving in Word format, OCR text is saved in addition to the image.
You can also add text directly to the captured image and convert the added text into a PDF. It can be used when you want to mark important points.
1. When you start the app, the shooting screen will appear immediately, so point the document you want to shoot and tap the [Shutter button]. If you want to shoot documents, you can leave the menu at the bottom of the screen as [Document], but you can change the settings to suit shooting whiteboards and business cards.
2. When you tap the [Shutter button], the border confirmation screen appears. Adjust it so that it matches the range of the document, and finally tap [Confirm].
3. If you tap [Filter] on the next screen, you can apply a filter that brightens the whole or increases the contrast of the text to make it easier to read. Set if necessary.
Also, as a function not found in other apps, it is possible to add characters and handwritten figures to the scanned image. It can be added from [Other] to [Text] or [Ink].
Finally, tap Done.
4. It will be a screen to specify the save destination, so select what you need. "Microsoft Lens" can save multiple files at the same time according to the format specified here. For example, if you select Gallery, PDF, and Word, you'll get a JPEG, a PDF, and a Word document.
In the case of PDF, Word, and PowerPoint, an Office Lens folder is created in the OneDrive document and saved in each format (By the way, Office Lens is the former name of Microsoft Lens). If OneDrive is specified, it will be saved in JPEG format in the Picture folder in OneDrive. The gallery will be saved in JPEG format in the gallery in the device.
Additionally, PDF and OneNote allow you to change the destination. For PDF, you can select either [Phone storage] or [OneDrive] by tapping the save destination path. OneNote allows you to specify the destination note.
You can open the captured document from each application, but when you tap [Menu] in the upper right on the first screen after launching "Microsoft Lens" and select [My files], "Microsoft You can display a list of files shot with Lens. If you select a file here, you can also display it directly from each application.
"Photo Scan" is an application for reading printed photos released by Google. It's not a document scanner, so it doesn't have features like text recognition or readability filtering. Also, the captured images are in JPEG format and cannot be scanned continuously or made into a single file.
Alternatively, you can automatically remove the reflected light and save it as a clean image. It can be said that it is suitable for capturing glossy paper such as catalogs. In addition, the image is saved in "Photos" on iPhone and "Gallery" on Android, just like photos taken with a normal camera app.
1. When you start the app, it will immediately go into shooting mode, so adjust the document so that it fits inside and tap the [Shutter button]. Then, four circles are displayed on the screen, so move the smartphone so that the center circles overlap in order.
2. A green mark will appear in the center when you have finished stacking four. After that, there is no change on the screen, but the scan is finished, so tap the [Preview icon] at the bottom right.
3. A list of imported images will be displayed, so tap the desired image. If the image is enlarged, but the range of the document is not correct, tap [Adjust corners].
4. Since a white frame is displayed, drag the circles in the four corners and adjust it to the range of the document. Finally, tap Done. In addition, there is no specification of the save destination, and the image is saved in "Gallery" on Android and "Photos" on iPhone.
In addition to the ones introduced here, there are many other apps that support document scanning, such as “OneDrive” and “Dropbox”. As with all of them, the image quality of the captured image depends on the smartphone camera. However, even with a high-definition camera, it is difficult to read the text in captured images in dark places or in situations where shadows are formed on the document when shooting. There are apps that allow you to adjust the contrast later, but it's best to make it easy to see when you import it.
Therefore, shooting in a place as bright as possible is the key to capture it clearly. Taking pictures by a window, turning on the lights in the room or desk even during the day, or using a flash when taking pictures can help you capture the image beautifully.
If you don't have a scanner at home and need to scan, this article is for you.


